

Are there parts of your house you wish you could makeover
somehow. They seem to make the rest of your house look oh so daggy, dated and
just plain messy? Could it be your garage? I know it was in our house. It was a
junk collecting, bad storage, dirty and ugly place to be. Hubby was constantly
frustrated with the dirt and grime in the garage and I was frustrated with how
outdated and ugly the whole place looked.

We decided that over the Christmas break we would (well
hubby actually) makeover the garage while he was on holidays. A few weeks
previous to the Christmas break he had painted the inside of the garage walls
so that would be one less job to do later on.

Our house is a classic late 70’s dark brown brick home – not
something I am in love with but it is only a cosmetic problem which can be
fixed with rendering which is on our “one” day list of things to do. However on
the inside of the garage hubby simply undercoated and painted the walls in a
neutral colour in which the interior of our home is also painted in “Dulux Hogs
bristle”. Painting the walls really changed the feel of the garage immediately
and I couldn’t wait to see the finished look once the floor was painted.
 |
| Walls Painted |
For the floors we decided to use the Rust-Oleum Epoxy Shield GarageFloor Paint Kit. This is an epoxy based paint kit specially designed to be used
on concrete floors. It will not flake, peel or rub off if done correctly. It
comes in a number of different sizes depending on the amount of square meterage that you need to paint. We needed a 2 ½ Garage kit plus a 1 Garage Kit for our garage which
would paint 500 sq feet.We decided upon the Tan Gloss paint colour to match in with the beige coloured walls.
Materials Required:
Rust-Oleum Degreaser
Hydrochloric Acid *We only used this as our floor already had a coating
on it, the kit includes a concrete etch to use if you have a bare concrete floor*
Protective Gear, glasses, gloves, face mask (To apply etch)
Rust-Oleum Epoxy Shield 2 ½ Garage Paint Kit (Tan Gloss) (In specific size for your area)
Rust-Oleum Epoxy Shield 1 Garage
Floor Paint Kit
Rust-Oleum Epoxy Premium Clear Coat Kit * Gives a show room finish
Rust-Oleum Epoxy Premium Clear Coat Kit * Gives a show room finish
Stiff Bristle Broom
Edging Paint Brush
8-10mm Nap Roller
Extension Paint Pole
Paint Tray
Application Process:
- Remove all items from the garage
- Give the floor a good sweep with a stiff brush.
- Degrease any oil areas from the floor. We used the Rust-Oleum heavy duty degreaser.
a.
Apply a generous amount of the degreaser over
the oil stain then with a stiff broom scrub the floor thoroughly. Hose and
sweep the whole area to completely remove all of the degreaser from the floor.
- Acid wash/Etch the floor:
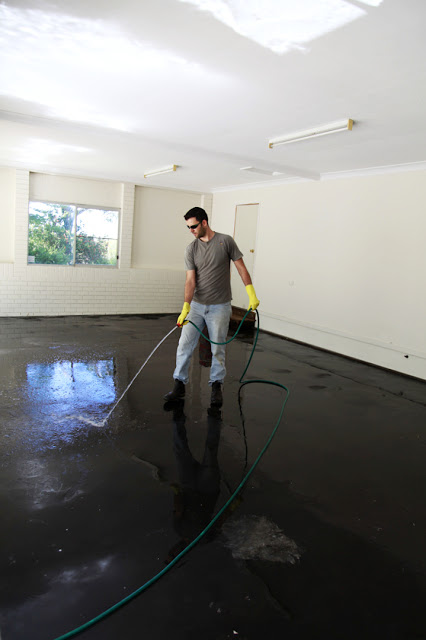
(DANGER: always wear protective
clothing, gloves and a mask and follow the instructions on the bottle)
a.
Due to the paint and sealer previously used on
our floor it was necessary to clean the garage floor with a hydrochloric acid
wash to lift any stubborn stains and remove the current clear coat and to
prepare the surface for the new paint.
b.
Make sure the floor is slightly damp with a hose
before adding the acid wash.
c.
Mix the hydrochloric acid wash 10 parts water 1
part acid wash in a plastic watering can. Evenly spread the acid over the
entire floor. For our garage I made 3 mixes to cover the whole area. Let the
acid react (foam) then give the floor a good wash out with a hose and stiff
bristle broom. Leave the floor to dry
completely.
 |
| Epoxy Shield Garage Paint Kit - Tan Gloss |
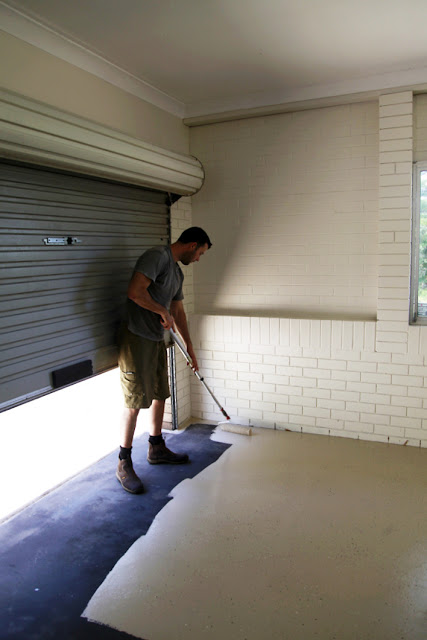
- Painting the floor: (Best results are achieved with 2 people)
a.
Mix the Epoxy Shield Garage Paint Kit part A
with part B and mix for 3 minutes to combined the two together
b.
Once the paint is well mixed, one person can
start cutting in around the edges of the floor with the edging paint brush
while the other person begins to roll the paint behind the first person. Once
an area of approx 2 sq m has been rolled the person doing the edging can apply
the paint chip. To apply the paint chips simply take a small handful of the chips
and toss them in the air above the wet paint. Allow the chips to fall down on
the paint and stick. Repeat the process with a smaller amount of chips if
necessary to fill some gaps.

c.
Keep this process going until the entire floor
in painted and coated with the paint chips.
*Note: You have a
limited amount of time to apply this paint before it is no longer usable –
approximately 90 minutes. So it is important to be completely prepared before
mixing the paint together.
d.
Leave the floor to dry for 24hrs before light foot
traffic and 4 days for vehicle traffic.

- Clear coat : (24 hrs after applying the paint the floor is ready for the clear coat)
a.
Combined part A and part B of the Epoxy clear
coat and pour in the non slip glass beads included in the pack. Stir until well
combined.
b.
Once again paint around the edges of the garage
floor and then roll the clear coat over the entire floor working in
approximately 2m wide swathes until the entire floor is covered.

*Note: As with the
floor paint the clear paint has a limited application time as well.
c.
Leave the floor to dry for 24hrs before light
foot traffic and 4 days for vehicle traffic.
________________________
Hubby painted the floor so he has given his detailed instructions above
on how he did it and any tips or tricks he used when applying it. The
transformation of the garage is now complete and I cannot be happier with the
result. The floor looks outstanding and came up a real treat.
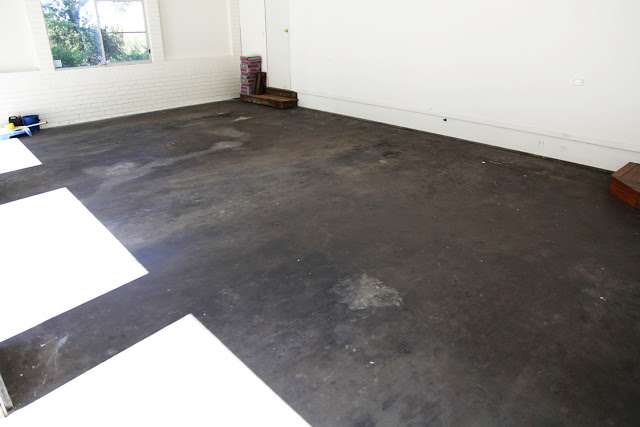
|
| Before |
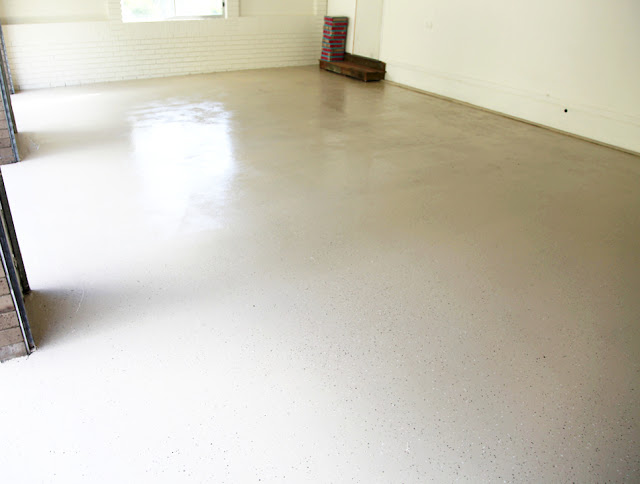 |
| After |
 |
| Before |
 |
| After |

If you are thinking about transforming your garage why not consider the
Rust- Oleum Epoxy Shield Garage Floor Kit for your next project. We were extremely happy with the
result and Bevan was impressed with how easy it was to apply.
- The Epoxy Shield paint and clear coat was straight forward and easy to apply
- Thorough instructions are included if you have any worries with the process
- Everything is included in the kit even down to the stirring stick which shows the quality of the product.
- Make sure you get the Clear Coat Kit. We are glad we finished the floor off with the clear coat as it gave the floor that extra sparkle and showroom finish.
Cons:
- Make sure the paint is evenly and the roller is properly coated when rolling onto the floor.
- Limited painting time. This paint has to be applied in a limited amount of time approximately 90 minutes.


I didn't stop there with the makeover. It was time to spruce up the storage benches located in the garage. They were not used to there full potential and when filled up looked messy and untidy. So what's a girl to do.... COVER IT UP! Yes that's what I did. I constructed some curtains out of some leftover canvas drop cloth that I used to make my Wingback Chair Covers. This is a sturdy but neutral material that blended in so well with the floor and wall colour.

I decided to make two curtains to allow easy entry into the under bench storage area. I hung the curtains up with some stretchy curtain wire and hooks. I think they covered up the storage area underneath quite nicely.

You would think we would dust our hands off and say job well done let's have a rest now. Errr not exactly! We have already started planning our next project - our grossly out dated laundry area. This poor part of the house really needs a serious makeover as did our Kitchen but thankfully that has been rectified. I have grand plans for this little space and I am REALLY excited to share with you the details of our plans in future posts!

