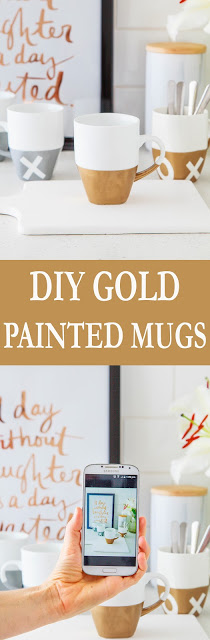
DIY Mother's Day Gift: Gold Painted Mugs + Video

Hi, guys, I've got a great series coming up over the next few weeks on making your own DIY gifts for Mother's day. If your fingers are feeling a little crafty and you want to create something simple but special for mum for Mother’s Day why not try your hand at creating a custom painted a mug. I think giving mum a gift you have put some serious love and attention into for Mother's day far outweighs a store bought gift. These mugs are totally on trend at the moment with a simplistic design and metallic paint job to delight your loved one. This project won’t take hours to complete, and the effect of a set of these mugs together is pretty spectacular. Only a handful of materials is required to create them which make them easy on the hip pocket. This is a great project for the kids to make with a little adult supervision. If you want a little more direction in making these scroll to the bottom and have a look at the video I created for the occasion.

Materials:
- Plain white mugs
- ESP - Easy Surface Prep spray
- Metallic gold or silver spray paint* (Make sure that it can be used on glass)
- Clear satin spray paint
- Masking Tape
- Newspaper

Step 1.
Wrap the masking tape around the top of the mug or in the design or pattern that you want to create. Make sure the edges of the tape are flat and pressed down, so the paint does not run underneath.
Step 2
. Stuff the inside of the mug with newspaper to stop any overspray from getting inside. In a protected open space, spray a light coat of the ESP spray over the exposed areas of the mug. Let this dry for 1 hour before repeating with a second coat.

Step 3
. Spray your chosen colour over the primed area of the mug. It is better to do a couple of light coats of paint instead of one or two heavy coats. This will help eliminate runs and drips on the mug and give a better finish to the paint job. Let the paint dry for at least two hours before repeating with a second or third coat. Leave to dry completely overnight.
Step 4.
To complete your mugs spray a coat of clear satin paint over the exposed areas of the mug and let this dry. Repeat with a second coat before letting it dry completely. Once dry carefully remove the masking tape from around the mug to reveal your design.
Step 5.
Wrap your custom painted mug in some pretty paper and top with a bow. Why not sneak a few choccies inside before wrapping for that extra special touch.

How well did these mugs turn out? I loved them and ended up making a variety of different colours with the same design. Well just because I couldn't help myself.