


DIY Toy Oven Makeover

Oh, guys, I can't believe I signed out of the blog at Christmas time and have only got round to posting something in the last week of January. Where has the time gone? I can make all sorts of excuses but to be honest, the blog has got put on the wayside since Litte Miss A was born and I am trying to find my groove again. I have also bee struggling with my health a bit since she was born and am still trying to find my feet again with that too. In all honesty, the jump from two to three kids has been kind of brutal on my sanity and am only starting to feel a little bit normal (whatever that is) again in the last week or so. That is why I am here because I really wanted to share with you this little Toy Oven Makeover I did late last year while I was still pregnant with Little Miss A.
I found myself a couple of months ago free from kids for a couple of hours one morning, so I decided to stop in at my local op shop for a browse. It's my guilty pleasure to be able to scour the op shops in peace and quiet without children running rampant up and down the aisles of the shop, pulling all kinds of rubbish out of the shelves and generally being pains in the butt. As I entered my local op shop, my eye caught this sad looking toy oven sitting in the corner just screaming for some love and attention. My heart went out to the poor little soul - if toy ovens have souls? You see I had a toy oven so similar to this when I was a kid that I had to snap it up there and then. The $20 price tag wasn't too bad either, so I handed over the money and manhandled it into the back of the car (while heavily pregnant)!! It sat in the garage for a couple of weeks until I decided (or had enough energy) to do something with it. I knew I wanted to modernise the look of it a bit and give it a good lick of paint to rid it of its awful pine finish. Childhood memories aside I found the pine finish quite hideous.


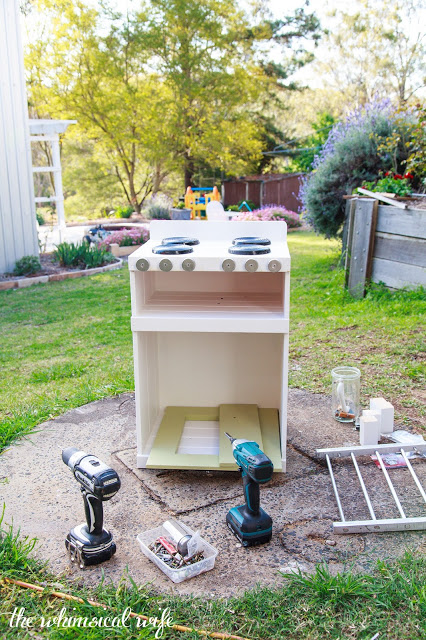
As you can see the poor thing was in a bit of disrepair with the oven door hinges busted, scratches on the perspex insert in the door and it was a little tired and dusty. Plus did I mention the hideous orange stain it had on it? So one afternoon I had a burst of energy and decided to make some miles and get this little oven made over.


I started by taking off all the hardware such as hinges, handles, doors and the perspex insert which I was going to replace with a new piece. I popped all the bits and bobs that I took off the oven into a large jam jar so I wouldn't lose any screws and could use them again when I put it all back together.

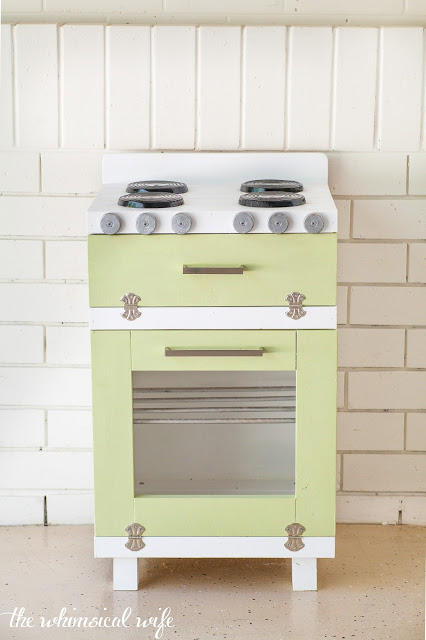
After all the fixtures had been taken off, I then gave the whole piece a sand down with 180grit sandpaper in preparation for painting. I used a stain blocker undercoat to prep the oven with so the underlying wood stain would not leach through to the top coat. Once the undercoat was dry, I started applying the top coat to the main oven. I used a plain white for the main oven and an olive green for the oven doors. I thought it gave it a nice homely feel.


When applying the top coat of paint, I would recommend using a foam roller. I find it gives a nice smooth finish to the piece and you won't see brush marks in the paint like you would with a paint brush. You can buy a large bulk pack of these mini foam rollers from your local hardware store. I find them invaluable when doing up a piece of furniture. They are reusable too so don't throw them out once you are finished painting. Make sure you give them a thorough wash out and let them dry ready for the next project.


While the main bits of the oven were drying, I went to task on painting the oven knobs and hobs using spray paint. I painted the knobs silver, and the hobs gloss black to mimic what a normal oven would look like. I went with an all-in-one type of spray paint that has a primer and topcoat in one. This means I don't have to undercoat the pieces first. Always make sure when spray painting anything that you are in a well-ventilated area as the fumes can get quite overpowering once a few coats of paint have been applied.

When all the pieces were dry, I started putting everything back together. I ordered a new piece of clear perspex from a shop on eBay for the oven door. Although it wasn't the cheapest thing to buy it did make the finished piece look shiny and new again. I picked up some new hinges for the oven door which matched the other ones nicely. I also found some new more modern looking brushed satin silver handles for the oven and grill doors. I picked up handles that matched the existing holes in the doors, so it meant I didn't have to putty the old ones up and drill new ones. Time saver right there.
If my memory serves me correctly (and it doesn't always), I think I managed to get the whole project painted in a weekend and put it together the next weekend once I had gathered all my new bits and bobs to put on it. So I would call that a pretty simple and quick project.
I had a little to much fun staging these photographs while the kids were napping. I wanted to get them in on the shots, but there was no way I was going to wake them up just for a picture. Nap times are sacred in my books at the moment. We presented the oven to the kids once we were finished it and I think they were impressed. Well, J.D was, and Little Miss H is finally getting what it's all about plus she's still a little short to stir things on top of the stove.

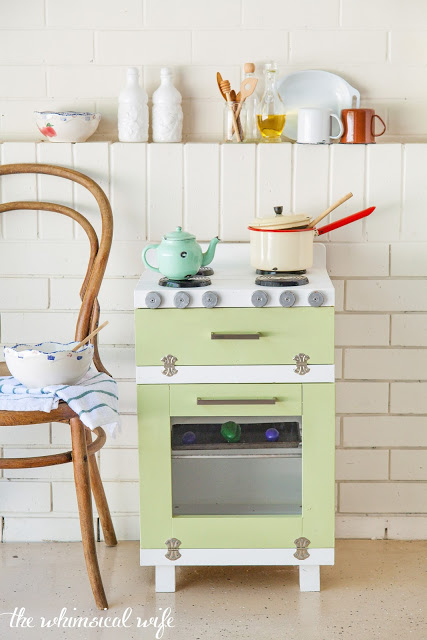
I hope that this toy oven will still have many more hours of play time left in it now that I've shown it a little love and spruced it up again. I remember as a child many hours of pretend baking and cooking over my stove and I hope that my kids will have the same memories as I have when they grow up.
Do you have a favourite childhood toy memory? Would love to hear what it was. Leave a comment below.

