


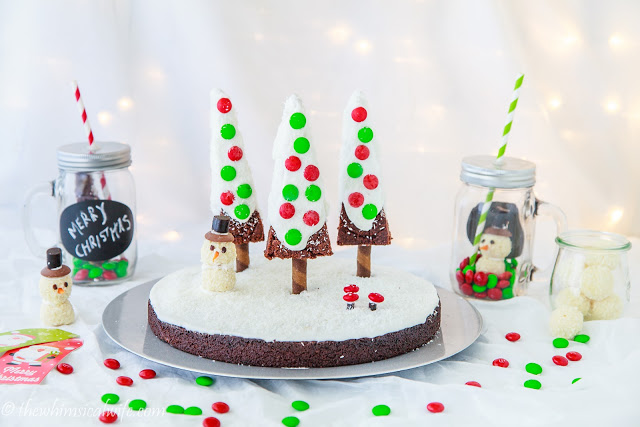
Toblerone Brownie Winter Wonderland
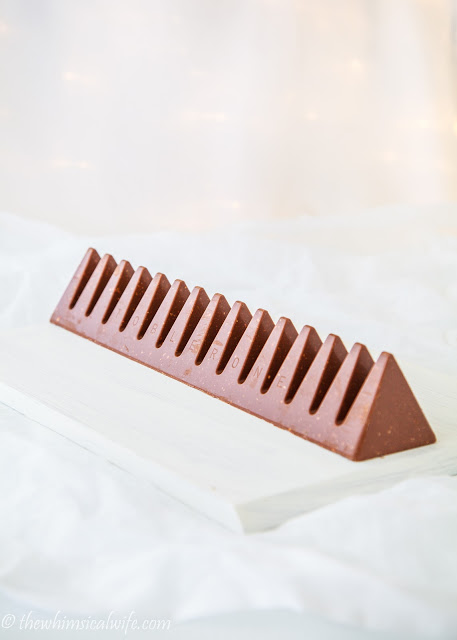
What do you do when you come across a Toblerone bar the size of a small baby? Yes, I know apart from shoving the whole thing in your face!! I was presented with this first world problem the other day, and I knew I wanted to do something more than scoff the whole thing down quick smart although that seemed like a good idea at the time. With the bells of Christmas time fast approaching I thought trying to create something special with Christmas in mind using this monstrous sized Toblerone bar seemed like a good idea. Brownies flitted through my mind followed by Christmas trees and a winter wonderland. My imagination might have just run away a little devising what to do with this monstrous chocolate bar. It was set I'd make a Toblerone Brownie Winter Wonderland because gingerbread houses were so last year.
had me sorted on all the bits and bobs I needed for this project starting with the baby sized Toblerone bar. I took my little boy, JD with me to
to get all the things I needed to create my own Toblerone Brownie Winter Wonderland. He had a blast wandering the aisles with me and choosing all the lollies to create my masterpiece. When I picked up the Toblerone bar to put in our basket, his eyes nearly popped out of his head. His little mouth went slack, and he whispered out, "That's amazing Mum". I couldn't help giggle a little to myself. "Do you like that bud?" I asked as I handed it over to him to put it in the basket. He replied ever so quickly "I eat it?" and he opened his mouth to try and eat the cardboard packaging. "No mate, mummy is going to make some brownies with it," I said eyeing the big Toblerone off wondering if I could sneak a piece before I baked it into brownies. It took a few more aisles to convince him we couldn't eat it there and then, but a little distraction with rows of cute Christmas tags and paper soon turned his attention elsewhere. Meltdown diverted! Christmas is such a magical time for kids isn't it? I have enjoyed being enchanted with Christmas all over again as I see it through my little guy's eyes. His delight at seeing all the Christmas decorations, lollies and many Santa figurines displayed around the place. He hasn't quite warmed up to the idea of approaching a dressed up Santa yet but is happy to admire from afar. It will be interesting to see how Little Miss reacts to the Big Red Man this year. My prediction is tears for sure.
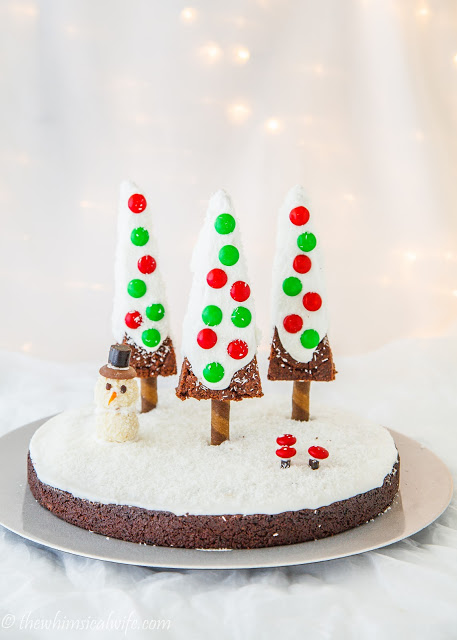
This Toblerone Brownie Winter Wonderland is a feast for the eyes and the belly and would make the perfect dessert centrepiece at your Christmas. Forget the gingerbread house this year! I am in love with this brownie recipe, and the addition of Toblerone chocolate brings it to a whole new level. In another life, I could have eaten half a tray of these brownies. I kept the brownie recipe simple with no extra additions such as nuts, however if you like nuts your brownie go ahead and add some. The Toblerone brownie has a beautiful crusty edge with a moist and delicious centre. Firm enough to hold together but decadent enough to melt in the mouth and the aroma that comes off these bad boys sets the mouth-watering. Chocolate heaven!
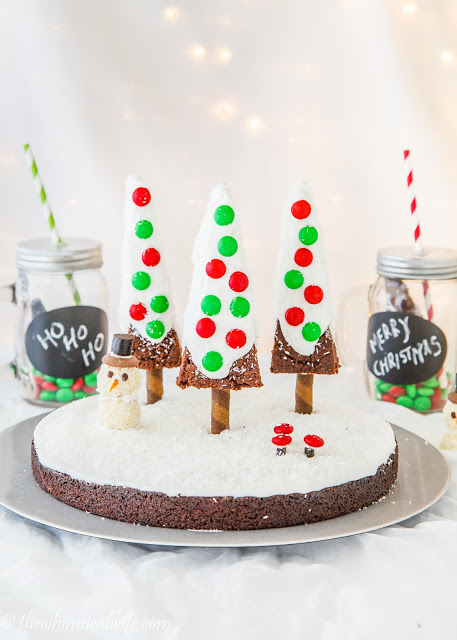
I couldn't help but let my inner child out with this latest dessert creation, and I hope that it can bring a little bit of magic back to your Christmas. Although it looks quite complicated to make, I can assure you with a little time you too can put together your enchanted forest. Don't forget to get the kids to help. I never got into the Frozen franchise but for those die-hard fans just mention that Olaf or Elsa might make an appearance in this wonderland, and they will be more than eager to help out. Just metre out the lollies because they will be all gone before you get a chance to decorate your Christmas Trees. I would recommend making this over a period of two days. Bake and ice the brownies on the first day and put together your wonderland the second day. Enough time to let the brownies completely chill and the icing to set on the Christmas trees. I have used a simple royal icing for the "snow" on the trees and base that is easy to make and sets firm. I used this as glue throughout the centrepiece, and it worked a treat.


If you are wondering where to go to get all the bits and bobs to make your winter wonderland make sure you pop into your local
. When you pop in you can pick up the following things:
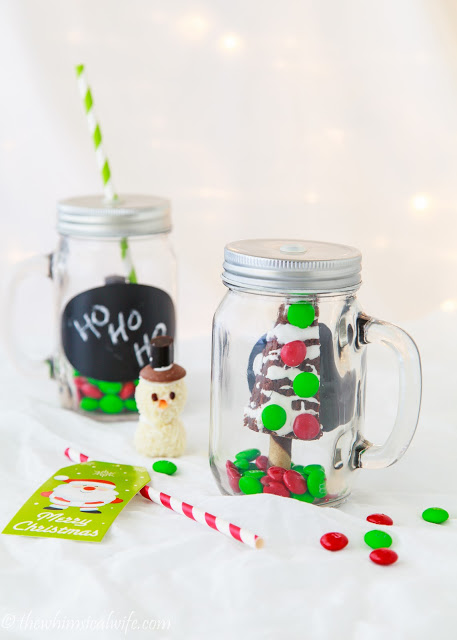
- Mason Jar with Blackboard Label
- 33cm Plastic Silver Serving Plate
- Red & Green M&M's
- Capricorn Liquorice
- Raffaello Truffles
- Kandyman Caramel Filled Chocolate Buttons
- Chocolate Cream Wafers
- 400g Toblerone Bar
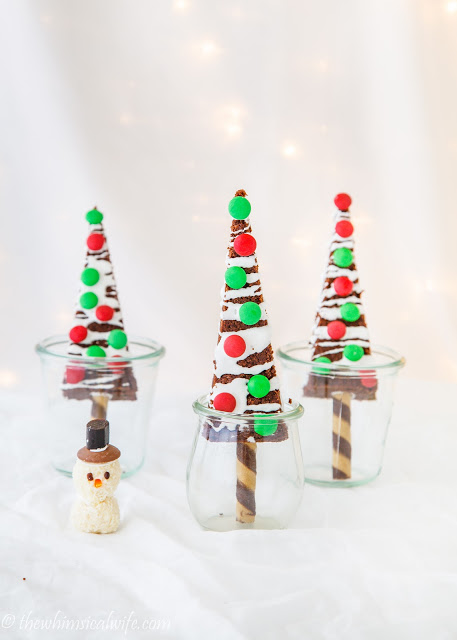
If the thought of trying to put together your winter wonderland seems too daunting, I have another option for those short on time and patience. Simply follow the instructions on baking the Toblerone Brownie Christmas Trees instead or make your own White Chocolate Truffle Snowmen. These still look great and would make great little favours or edible gifts for teachers, co-workers or secret Santas. Simply bottle them up in cute mason jars and sprinkle in some festive green & red M&M's. One quick word of warning, though – if the temperature is pushing 30 degrees C or more I would recommend keeping these items refrigerated until serving, giving, etc. Nobody wants a melted winter wonderland for dessert!
Toblerone Brownie Winter Wonderland

Prep Time:
2 hours + Chilling
Cook Time:
30-35 minutes
Serves:
6-8
Ingredients
:
Toblerone Brownie Mix
- 400g Toblerone Chocolate
- 400g butter, unsalted
- 2/3 cup cocoa
- 1 cup castor sugar
- Pinch salt
- 2 teaspoon vanilla essence
- 6 eggs, lightly beaten
- 1 cup plain flour
- 1/2 cup self-raising flour
Royal Icing
- 2 x egg whites
- 1 teaspoon lemon juice
- 3 cups icing sugar, sifted
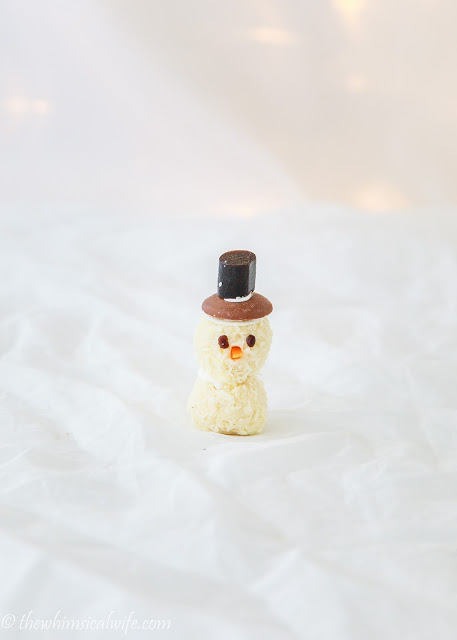
Snowmen Truffles
- 12 x White Chocolate Raffaello Truffles
- 6 x Kandyman caramel filled chocolate buttons (Can substitute normal chocolate buttons)
- 3 x pieces Capricorn soft eating liquorice
- Tiny slivers of Carrot – for nose
- Tiny pieces of Sultana – for eyes
Mushrooms
- 3 x red M&M's
- 1 x pieces Capricorn soft eating Liquorice
To Decorate Christmas Trees
- ¼ cup desiccated coconut
- 1 cup Red & White M&M's
- 3 x Chocolate-Filled Cream Wafers
To Serve
- 33cm Silver Plate to display the Winter Wonderland
Instructions:
Christmas Trees - Line an 18cm x 28cm rectangular slice tin with baking paper.
Base – Line a 25cm round cake tin with baking paper
- Preheat oven to 175 degrees C (fan bake).
- In a large microwavable container add in the Toblerone chocolate, broken up into pieces and butter and heat on Medium-High power for 1 minute. Give a little stir and heat for a further minute until melted and smooth.
- Sift in the cocoa and add the sugar, salt & vanilla essence to the chocolate mixture. Add in the lightly beaten eggs and mix well to combine the ingredients.
- Sift the flours into the chocolate mixture and gently stir to combine. Divide the brownie mixture evenly into the round cake tin and the rectangular slice tin. Spread the brownie mixture into the prepared tins and bake for 30-35 minutes or until a skewer inserted into the centre comes out clean.
- Let the brownies cool completely in the tin and then place the tin in the fridge to chill for 2 hours.
Royal Icing
- In a bowl add the egg white and whisk gently with the lemon juice. Add in the sifted icing sugar and mix until a runny but slightly firm icing is formed.
- Cover the bowl with cling wrap to stop the icing from drying out.
Christmas Trees
- Once the brownies have cooled remove the rectangular brownie from the fridge. Gently lift it out of the tin onto a large cutting board. Cut the edges off the slice to form clean starting lines.
- With the long edge facing you, cut triangles along the width of the brownie in a zig zag motion. The base of each triangle should be around 4cm in length.
- Cut the chocolate cream wafers in half and dip one end into the royal icing. Gently insert the icing end of the wafer, halfway into the base of the triangle to form the trunk of the tree. Use the royal icing as glue if any pieces of brownie break off when inserting the trunk.
- Set the brownies trees evenly out on top of a cooling rack. Spread a thin layer of the royal icing on the top half of the tree to create the "snow covered" top.
- Place it back into the fridge to set for 15 minutes and then repeat with another layer. Sprinkle a fine layer of desiccated coconut over the top of the royal icing.
- Press the M&M's onto the front as "ornaments". Place the trees back into the fridge to chill and let the icing set.
Snowmen Truffles
- Gently cut a flat spot on the top and bottom of each Raffaello truffle. Dab a tiny amount of royal icing on top of three of the truffles.
- Gently press the remaining truffles on top to form the body of the snowman. Let the icing set. With the pointy end of a sharp knife cut two divots in the top truffle for the eyes and nose.
- Add a very small amount of royal icing into these divots and place the sultana eyes and carrot nose to create the face on the snowman.
- Add another dab of icing on the top truffle and press on the caramel filled chocolate buttons.
- Cut each piece of liquorice into 3 pieces and put a tiny dab of royal icing on the base of each piece.
- Press the iced end of the liquorice onto the caramel filled chocolate buttons to create the top hat. Place the Snowmen Truffles into the fridge to set.
Winter Wonderland Assembly
- Remove the round brownie from the cake tin; add a few teaspoons of the royal icing onto the top of the silver serving plate and press the round brownie on top of the icing on the silver serving plate. This will stop the base moving around on the plate and ruining all your good work.
- Using the pointy end of a sharp knife cut three evenly spaced small holes into the brownie base for the cream wafer trunks to sit in.
- Place toothpicks into each hole so you know where they are located. Then add a layer of royal icing over the entire top of the brownie base and add a fine layer of desiccated coconut on top to create the "snow".
- Add the Winterland Mushrooms (Instructions below) and the Snowmen Truffles onto the base.
- Remove the Christmas Brownie Trees from the fridge, remove the toothpicks from the brownie base and dip the tip of the cream wafer trunk into the royal icing. Gently press the entire Christmas Brownie tree into the hole in the brownie base. If you need to stabilize, the trees press a skewer in behind the tree to keep it upright and stable.
- You can serve immediately or pop it back into the fridge until you want to make your grand entrance with your spectacular Toblerone Brownie Winter Wonderland.
Winterland Mushrooms
- Cut small pieces of liquorice to create the mushroom stalk and press it into the royal icing top on the round brownie base.
- Using a toothpick add a small dab of royal icing to the top of the liquorice stalk and press the red M&M on top.
- Using the toothpick dipped into the royal icing add small dots of icing on top of the M&M to create the spots. Repeat to create a crop of three mushrooms.
Powered by
Toblerone Brownie Christmas Trees

Prep Time:
1 hour + Chilling
Cook Time:
30-35 Min
Makes:
4-6 trees
Ingredients
:
Toblerone Brownie Mix
- 200g Toblerone Chocolate
- 200g butter, unsalted
- 1/3 cup cocoa
- 1 cup castor sugar
- Pinch salt
- 1 teaspoon vanilla essence
- 3 eggs, lightly beaten
- ½ cup plain flour
- ¼ cup self-raising flour
Royal Icing
- 1 x egg white
- ½ teaspoon lemon juice
- 1 1/2 cups icing sugar, sifted
To Decorate
- Red & White M&M's
- Chocolate-Filled Cream Wafers
To Serve
- Mason Jars
Instructions
- Line an 18cm x 28cm rectangular slice tin with baking paper. Make 1 x batch of brownie mix.
- Preheat oven to 175 degrees (fan bake).
- In a large microwavable container add in the Toblerone chocolate and butter and heat on Medium-High power for 1 minute. Give a little stir and heat for a further minute until melted and smooth.
- Sift in the cocoa and add the sugar, salt & vanilla essence to the chocolate mixture. Add in the lightly beaten eggs and mix well to combine the ingredients.
- Sift the flours into the chocolate mixture and gently stir to combine. Spread the brownie mixture into the prepared tin and bake for 30-35 minutes or until a skewer inserted into the centre comes out clean.
- Let the brownies cool completely in the tin and then place the tin in the fridge to chill for 2 hours.
Royal Icing
- In a bowl add the egg white and whisk gently with the lemon juice. Add in the sifted icing sugar and mix until a runny but slightly firm icing is formed.
- Cover the bowl with cling wrap to stop the icing from drying out.
To Assemble
- Once the brownies have cooled remove them gently from the tin onto a large cutting board.
- Cut the edges off the slice to form clean starting lines. With the long edge facing you, cut triangles along the width of the brownie in a zig zag motion. The base of each triangle should be around 4cm in length.
- If you are trying to jar up the trees, you might need to cut the triangles slightly smaller to the size of your jars keeping in mind that a wafer trunk will be added later.
- Cut the chocolate cream wafers in half and dip one end into the royal icing. Gently insert the icing end of the wafer, halfway into the base of the triangle to form the trunk of the tree.
- Use the royal icing as glue if any pieces of brownie break off when inserting the trunk.
- Set the brownies trees evenly out on top of a cooling rack. Gently drizzle the royal icing back and forth over the top of the brownies to create the "tinsel" on the tree. If the icing is a little thick add a teaspoon of water at a time to thin it down.
- Once you are happy with the icing, gently add on the M&M's onto the top of the brownie to form the "ornaments". Place the trees back into the fridge to chill and let the icing set.
- Arrange the Toblerone Brownie Christmas Trees on a platter and serve to your guests or package up in your favourite mason jar and finish with a tag for good measure.
Powered by

