DIY Easter Bunny Crossing Sign
I can't believe it is Easter week already and here we are on the countdown to Easter again. So I thought I would share with you a couple of great DIY Easter projects that you can have fun with the kids making in preparation for the BIG day. I know my kids get seriously excited about the incoming Easter Bunny so having them create something in preparation for the day makes them seriously happy.
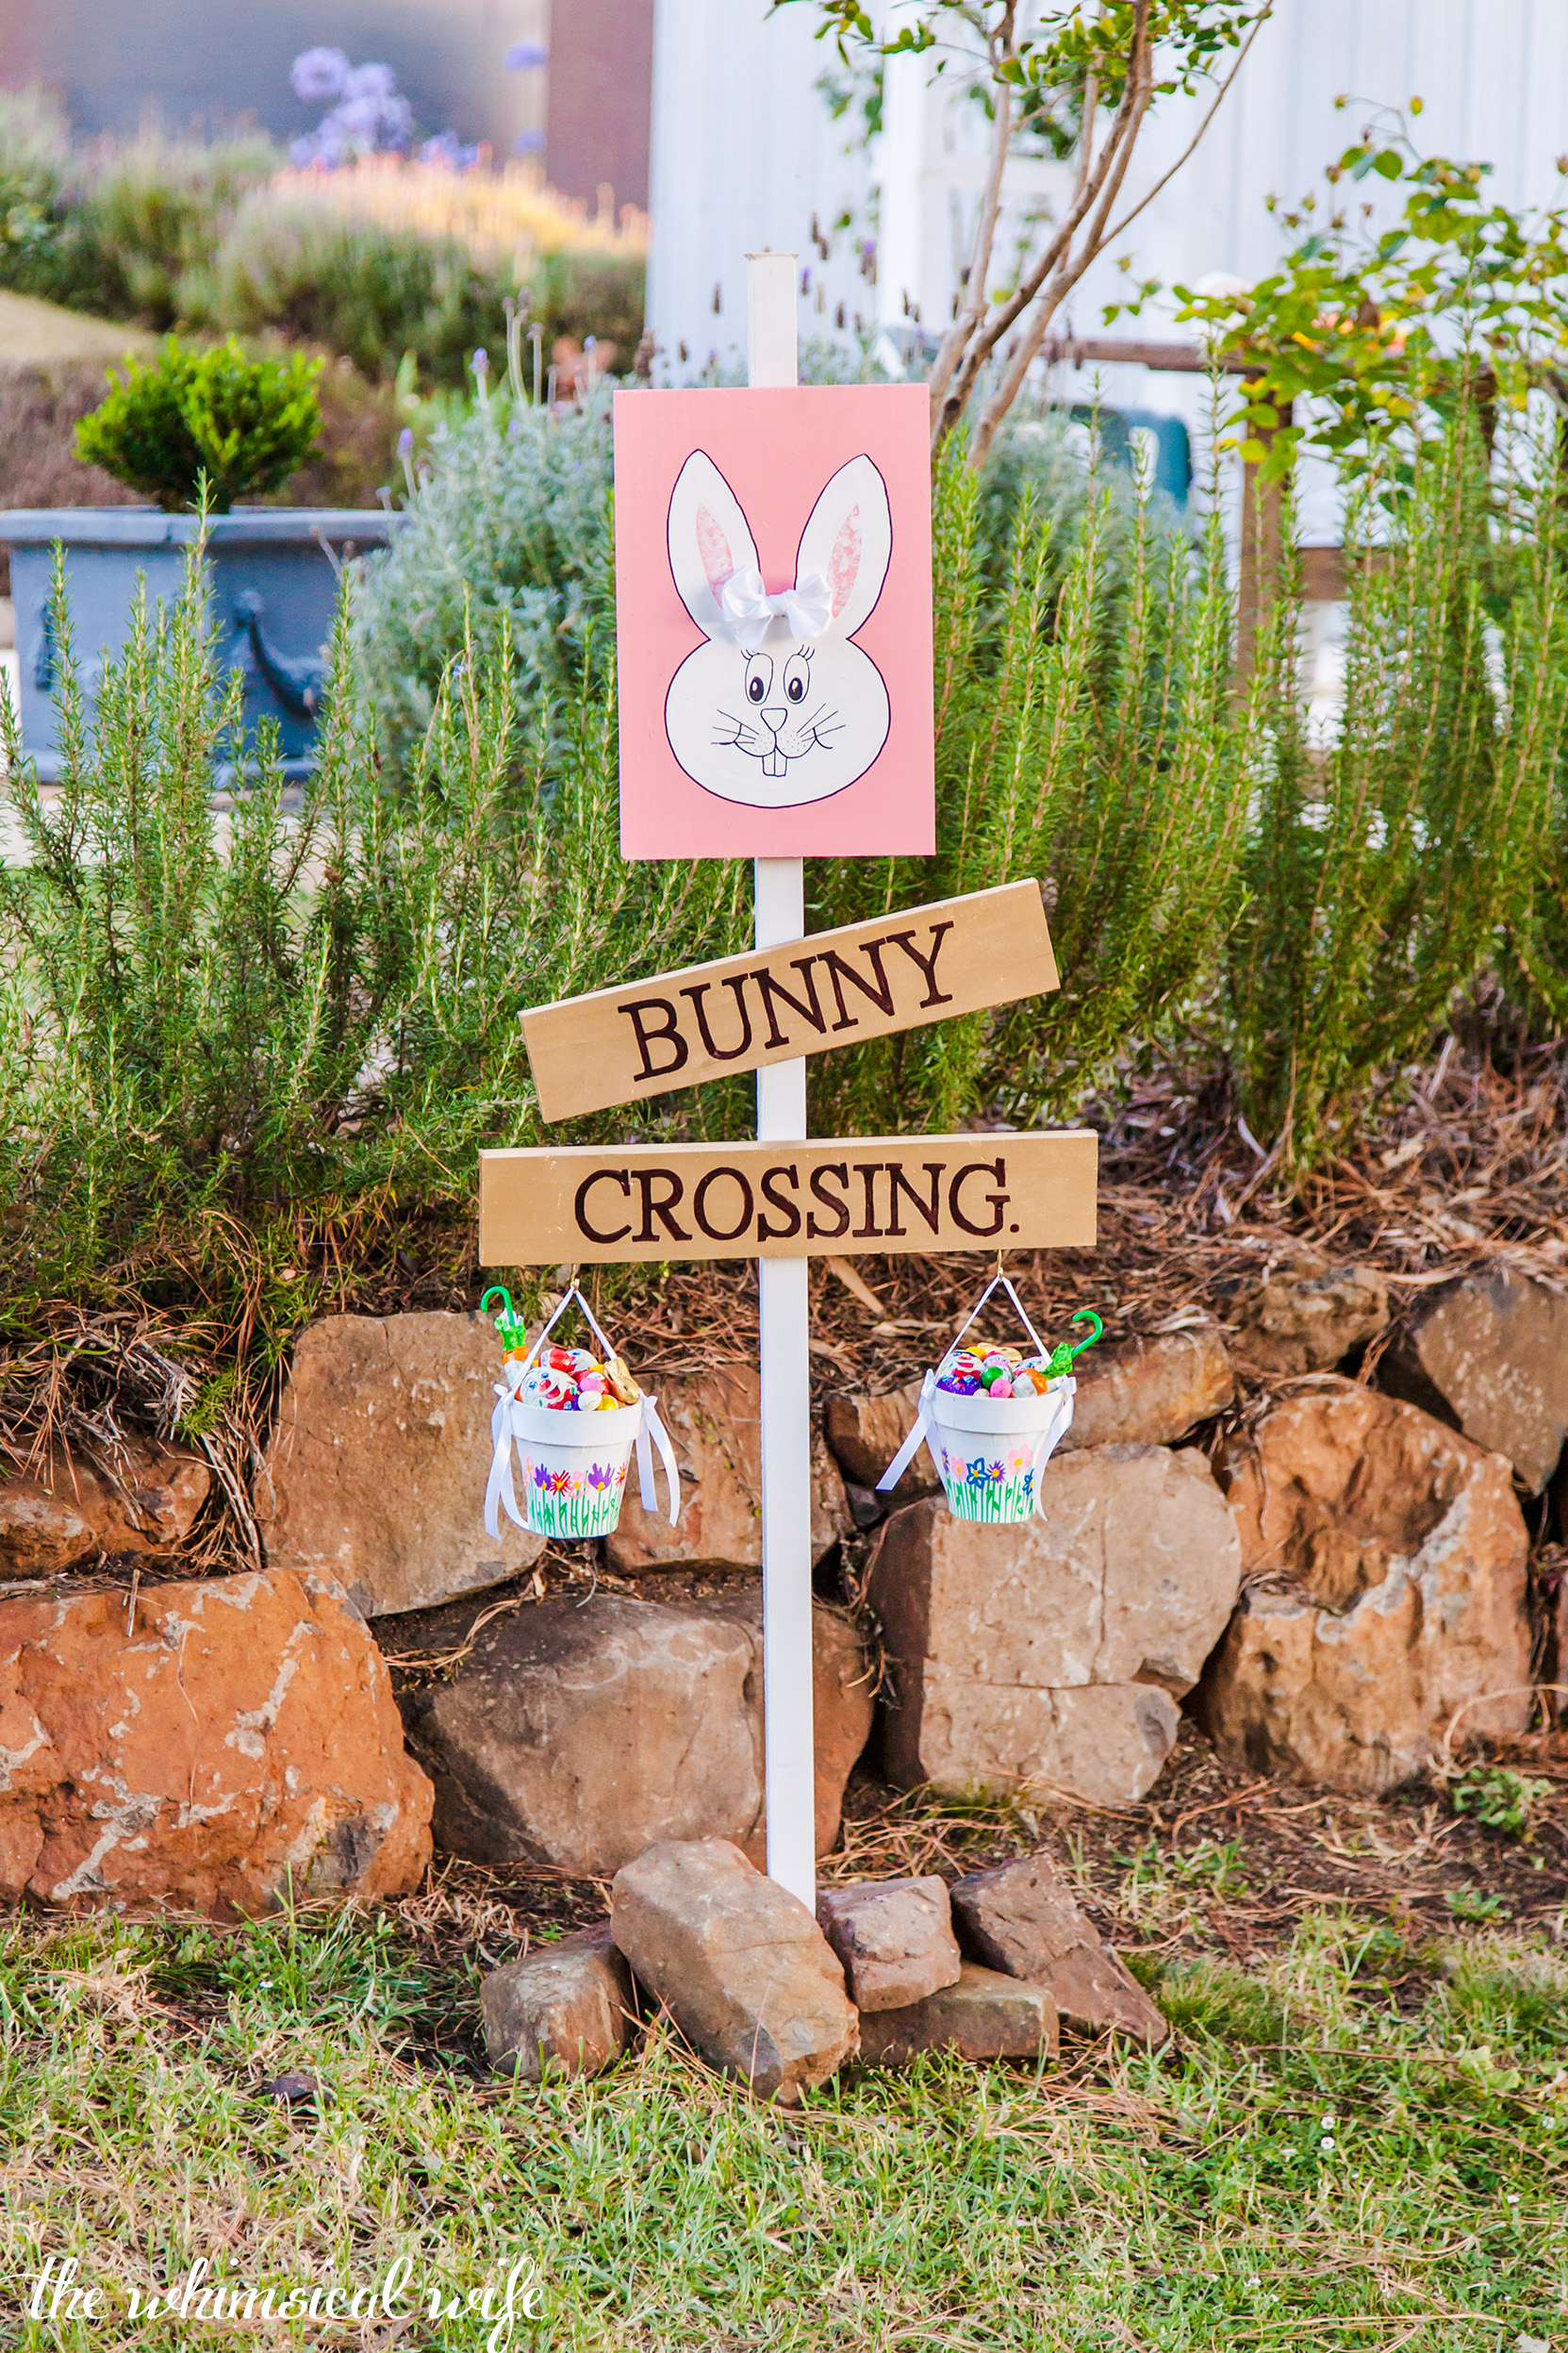
Today I am showing you how to create a seriously cute DIY Easter Bunny Crossing Sign to pop in your garden or out the front of your house ready for an Easter egg hunt. Pop on a couple of cute decorated homemade buckets and your little Easter bunnies will have fun finding some chocolate eggs. So let's jump into how to make your own.

Materials:
- Pink acrylic paint
- White acrylic paint
- White spray paint – Paint & Primer in 1
- Gold spray paint – Dulux Dura Max
- Bunny Face Template
- 30cm white ribbon
Tools:
- Drop saw
- Small Foam Roller
- Sharpie permanent marker
- Pencil
- Biro
- Small artist paintbrush
- Craft Glue
- Drill & Drill bit
Cut List:
** This is only a guide for what sizes of wood I used. You can use what you have lying around the house for something similar.
Premium Grade Pine
- Pole: 42mm x 19mm x 1400mm
- Bunny Face Board: 235mm x 19mm x 340mm
- Sign – Bunny: 89mm x 19mm x 400mm
- Sign – Crossing: 89mm x 19mm x 460mm
Fastener List:
- 6 x 10g 40mm Galvanised Countersunk Self Embedding Screws - USE: Bunny Face Board, Bunny & Crossing Sign.
- 2 x 32mm cup hooks USE: Crossing sign

Cut the lengths of timber required for the sign using a drop saw. Make sure that you cut the bottom end of the pole into a point to help insertion into the ground. Paint the pole using the white spray paint and let it dry. Two coats may be required for even coverage.


Spray the bunny crossing sign pieces with the gold spray paint. Apply two coats of the gold paint for even coverage. Let the pieces dry overnight before assembling.
Print off the letters required for the Bunny Crossing using a word document. Choose a font and size suitable for the size of the wood pieces. Colour the back of the sheets of words with the lead pencil. Turn over and centre on the first piece of wood.

Use the biro to trace around the letters onto the board. Remove the piece of paper, and you will see an imprint of the letters on the board. Colour the letters in using the permanent marker and set aside to dry. Repeat with the second board. Attach the two cup hooks to either end on the underside of the “crossing” sign.


Paint the bunny face board using the pink acrylic paint and foam roller. Apply two coats of the paint letting it dry for at least 2 hours between each coat.
Using the same technique as the Bunny Crossing Sign trace the bunny face onto the pink board. Paint the face silhouette using the artists paint brush and white acrylic paint. Apply 2-3 coats letting it completely dry in between each coat.

Draw on the face details with the permanent marker making sure to trace around the outside of the face and ears. Tie a small bow with the white ribbon and attach in between the bunny ears using the craft glue. TIP: Google “Bunny Faces” to use as a template for the Bunny Face sign.


To create the sign first attach the bunny face sign to the white pole by drilling two pilot holes through the pole and sign making sure not to go through to the other side. Secure using the two countersunk self-embedding screws with the drill. Leave a 5cm gap between the bunny face sign and repeat this process with the two sign pieces. Hammer into soft ground using a sledgehammer. Attach homemade Easter baskets ready for the kids to go easter egg hunting.


I am so happy with how this Easter Bunny Crossing Sign turned out. It's super cute if I don't say so myself. If pink isn't your colour (i.e you have boys in the family) then go for a colour that suits say a mint green or baby blue. Pastels always go well on any Easter themed project. This sign featured in the March issue of the Australian Handyman Magazine so you can check the project over there as well. If you do make one of these for your Easter egg hunt I would LOVE to see it. Tag me over on Instagram or Facebook with your creation.


My little girl was smitten with this sign (because it was pink) ha but she also loved the bunny face. I was a little proud of how the bunny face turned out. I thought it was pretty darn cute. If you have any questions on how to put the project together don't hesitate to leave a comment below.


Digital discoveries
- Meilleur Site De Casino En Ligne Belgique
- Migliori Siti Casino Online
- Casino Online Non Aams
- Meilleur Site De Paris Sportif International
- Meilleur Casino En Ligne 2026
- Tout Nouveau Casino En Ligne
- Casino En Ligne Français
- Casino En Ligne France Légal
- Crypto Scommesse
- Casino Avec Bonus Sans Depot
- Miglior Casino Online Non Aams
- Casino En Ligne France Légal

